
Distance Measurement using Ultrasonic Sensor and Arduino
Interfacing dynamic sensors with microcontrollers is one of the most exciting ways to learn embedded systems and physical computing. This guide explains how to build a real-time distance measurement device using an Arduino Uno, an HC-SR04 Ultrasonic Sensor, and a 16x2 LCD display.
Components Overview
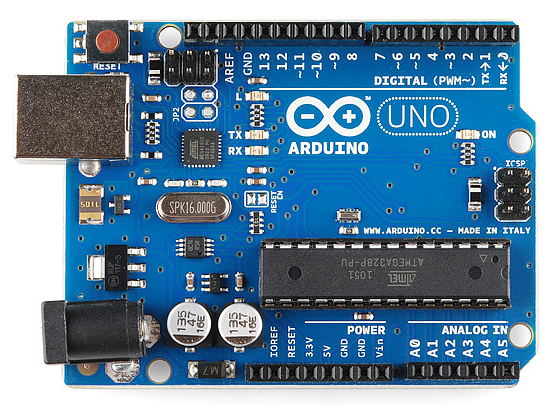
1. Arduino Uno
Arduino is an open-source electronics platform that encompasses both hardware and software components. At its core, Arduino boards feature microcontrollers, such as the popular Atmel AVR family, with built-in input/output pins for interacting with external components. The Arduino Integrated Development Environment (IDE) provides a user-friendly interface to write, compile, and upload code to the board, simplifying programming with its C/C++ language support.
2. HC-SR04 Ultrasonic Sensor
An ultrasonic sensor is a device that uses sound waves at frequencies higher than the human audible range to measure distances and detect objects without physical contact. It works based on the principle of sending ultrasonic pulses and measuring the time it takes for the sound waves to bounce back after hitting an obstacle.

How an Ultrasonic Sensor Works
An ultrasonic sensor works by emitting high-frequency sound waves (ultrasonic pulses) and measuring the time it takes for the waves to bounce back after hitting an object. The sensor then calculates the distance to the object based on the time of flight of the sound waves. This distance measurement technique allows the sensor to detect objects or measure distances without any physical contact, making it useful in various applications such as distance sensing, object detection, and collision avoidance.

The Physics & Formulas
The speed of sound in air is approximately 344 m/s.
- Basic Formula: \(\text{Distance} = \text{Speed} \times \text{Time}\)
In the Arduino code, the duration variable stores the total round-trip time taken by the sound wave traveling from the emitter, bouncing off the object, and returning to the receiver. This is double the time needed to reach the target. Therefore, the time taken to reach the object is exactly half of the total measured time.
- Applied Formula: \(\text{Distance} = \text{Speed of Sound in Air} \times \left( \frac{\text{Time Taken}}{2} \right)\)
3. 16x2 LCD Display
A 16x2 LCD (16 characters by 2 lines) is a popular alphanumeric display module used in a wide range of electronic applications. It consists of 16 columns and 2 rows of character spaces, allowing it to display up to 16 characters per line for a total of 32 characters.

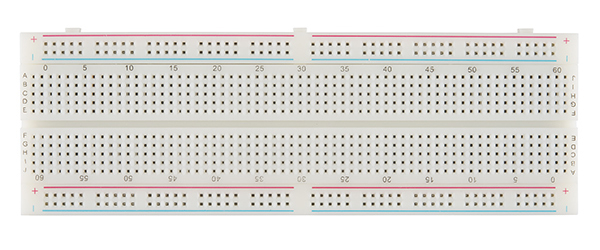
4. Breadboard
A breadboard allows electronics enthusiasts, hobbyists, and engineers to build and test circuits quickly without soldering. It consists of a grid of interconnected holes that allow components and wires to be inserted easily. A “breadboard short” refers to an unintended electrical connection (short circuit) between two or more points on a breadboard, which should be avoided during wiring.
Circuit Connection Diagram

Setup Steps
- Connect the Echo pin of the sensor to pin 6 of the Arduino.
- Connect the Trigger pin of the sensor to pin 7 of the Arduino.
- Wire the 16x2 LCD display: Associate
rsto 12,ento 11,d4to 5,d5to 4,d6to 3, andd7to 2. - Open the Arduino IDE, navigate to
Tools, and select your correct Board and Port. - Verify, compile, and upload the sketch to the Arduino Uno board.
- Monitor the output in the Serial Monitor or view the distance directly on the LCD display.
Arduino Sketch Source Code
Here is the complete Arduino sketch:
#include <LiquidCrystal.h>

// Initialize the library by associating the LCD interface pins
// with the Arduino pin numbers they are connected to
long duration;
int distanceCM;
int distanceInch;
const int rs = 12, en = 11, d4 = 5, d5 = 4, d6 = 3, d7 = 2;
LiquidCrystal lcd(rs, en, d4, d5, d6, d7);

void setup() {
  // Set up the LCD's columns and rows:
  lcd.begin(16, 2);
  pinMode(7, OUTPUT); // Trig Pin
  pinMode(6, INPUT);  // Echo Pin
  lcd.clear();
}

void loop() {
  delay(120);
  lcd.clear();

  // Trigger the ultrasonic sensor by sending a 10us HIGH pulse
  digitalWrite(7, LOW);
  delayMicroseconds(2);
  digitalWrite(7, HIGH);
  delayMicroseconds(10);
  digitalWrite(7, LOW);

  // Read the bounce duration in microseconds
  duration = pulseIn(6, HIGH);

  // Calculate distance in cm and inches
  distanceCM = (duration * 0.034) / 2;
  distanceInch = (duration * 0.0133) / 2;

  // Display distance in centimeters on Row 1
  lcd.setCursor(0, 0);
  lcd.print("Distance: ");
  lcd.print(distanceCM);
  lcd.print(" Cm");
  delay(10);

  // Display distance in inches on Row 2
  lcd.setCursor(0, 1);
  lcd.print("Distance: ");
  lcd.print(distanceInch);
  lcd.print(" In\"");
  delay(10);
}
Conclusion
The ultrasonic sensor is a versatile component in DIY electronics projects, offering non-contact distance measurement and position sensing for robotics, home automation, and smart security. With an Arduino Uno, it is straightforward to capture, convert, and output sensor readings on a dynamic display.
[!NOTE] All code, wiring blueprints, and related project files are hosted on GitHub. Go ahead and start building!
Contact Info & Links
- Email: harshinde.hks@gmail.com
- Portfolio Website: harshshinde0.github.io
- GitHub Profile: github.com/HarshShinde0